skip to main |
skip to sidebar
 Materials
-1 skein of yarn
-Size #7 knitting needles
-Crochet hook or darning needle
-Scissors
-Tape Measure
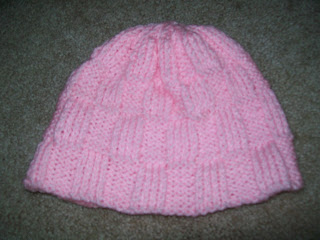
Pattern
Cast on 76 st.
Row 1: k4, p4 until end of row, ending with a k4
Row 2: p4, k4 until end of row, ending with a p4
Repeat rows 1 and 2 until piece measures 2 inches.
Row 3: p4, k4 until end of row, ending with a p4
Row 4: k4, p4 until end of row, ending with a k4
Repeat rows 3 and 4 until section measures 2 inches. The entire project should now be 4 inches.
Repeat these 4 inches again, the final piece should equal 8 inches.
Row 5, 7: k2tog across row
Row 6, 8: purl
Row 9: k2tog until 1 st. is left on needle, k1
Finishing
Leave a long tail long enough to sew the seam. With the crochet hook or yarn needle, sew the edge of the hat together, making sure the right side (knit top) is facing out. After the edge is sewn, flip the hat inside out making the wrong side (purl top) the right side. Weave in ends and enjoy!
 Triangular Chew Toy
This knit chew toy is perfect for energetic little puppies that need something to bite. This is a great project for practicing increases and decreases. It is unique because, instead of knitting two separate pieces, it is knit as one piece and then is sewn at the edges.
Materials
- Size #7 Knitting Needles
- 1 Skein Worsted Weight Yarn (I used chunky yarn)
- Crochet Hook or Sewing Needle
- Scissors
-Scrap Yarn or Fiberfill
Gauge
Does not matter.
Pattern
With size #7 needles, cast on 30 st.
Row 1: Knit2tog, knit until last 2 st., knit2tog
Repeat this row until there are 4 st. on the needle.
K2tog (Twice).
K2tog.
Knit st.
M1, knit until last st., M1
Continue M1, knit until last st., M1 until there are 30 st. on needle.
Cast off.
Finishing
Fold down one half of the project and match up the sides so that it makes a triangle shape.
Sew together all sides and leave a 1-inch opening to stuff the toy.
After stuffing the project with scrap yarn or fiberfill, sew up the remaining opening.
Add fringe at corners if desired.
Give the new chew toy to your beloved pet and ENJOY!
 Knitted Ipod Case
This ipod case protects the device's screen and prevents unwanted scratches. This case is made for a 3rd generation ipod nano.
Materials
- Size #7 Knitting Needles
- 1 Skein Worsted Weight Yarn (I used chunky yarn)
- Crochet Hook or Sewing Needle
- Ruler or Tape Measure
- 2 Double-Pointed Needles
- Scissors
Gauge
Does not matter, but watch the size of the case to make sure that it isn't too big or too small.
Pattern
With size #7 needles, cast on 11 st.
Knit in garter st (Optional: stockinette st, rib st, moss st) until piece measures 3 1/2 inches.
Cast off.
Make a second piece the same as the first.
Optional:
With the double-pointed needles, make an icord.
Knit until desired length.
Finishing
With the crochet hook or sewing needle, sew together the two front and back pieces. Sew together the two longer sides and one shorter side. Leave the other short side open.
With Icord:
Take one end of the icord and tie it to the one end of the open side of the case. Take the other end of the icord and do the same to the other end of the open side. The ipod case should have a purse-like appearance.
Enjoy!
Sorry if the pattern isn't very clear at some parts. This is the first pattern I have created by myself.
Note: I crocheted a chain and used that instead of the icord in the picture.
Like this pattern? Check out another one of my patterns at www.awesomeknittingpatterns1.blogspot.com.